8/26/09

One Thing Leads to Another....

In yesterday's post, I made a tasty little Salsa Verde. I mentioned that I might make it with olives in place of the capers called for. Well, of course today I had to try it!

This is another very quick and easy recipe. Another plus is the fact that you don't need any fancy equipment, just a knife and cutting board!

You could say this is a cross between a tapenade and a salsa verde. It is fantastic on sliced tomato, or as a salad dressing. Also great as a dip for essene bread.

Kalamata Karma Dressing

1 handful flat leaf parsley
1 handful basil
3 tablespoons kalamata olives
3 tablespoons olive oil
1/2 small shallot
juice of 1 lemon
few grinds of black pepper

1. Finely chop parsley, basil, shallot, and olives.

2. Transfer to a small bowl and add the olive oil, lemon juice, and pepper.

I topped my rosemary crackers(cut into leaf shapes) with slices of red, orange and yellow tomato. Add a small spoonful of the olive mixture, and a small sprig of fresh rosemary. I love balsamic, so I drizzled a little on too:) It is amazing how much flavor is in each bite!

Here it is as a topping for beautiful organic heirloom tomato slices, with a sprinkle of capers, and some pine nut Parmesan. A sprinkle of pine nuts will be fine if you don't have the parm:)


Here are some links for buying raw olives. You may also be able to find them at co-ops like I do, in containers in the fridge:)

Adams' Olive Ranch

Sunfood Nutrition

Raw Guru

8/25/09

Basil Salsa Verde


Many times I find a lovely mostly raw recipe in a 'regular' magazine. This is a quick and easy recipe found in First magazine by Aida Mollenkamp of The Food Network. This recipe is also found online.

Thanks to Aida Mollenkamp for this wonderful, flavorful recipe!

Here is the recipe as it appeared in the magazine:

I just grabbed a handful of basil and flat leaf parsley and chopped them up with 1/2 a shallot. I added 3 tablespoons of capers to a small bowl, and added about 3 tablespoons of my favorite olive oil and the juice of 1 lemon. I did not use the salt, as the capers have enough salt for my taste:) Just a few grinds of pepper, and the salsa verde was done! The capers are considered 'not raw' in this recipe, but I love them so much I often include them in small amounts. I thought of using raw olives next time for all, or part of the capers.Update: Here it is using olives:)

I can think of quite a few things I would like to try this simple recipe on, but for today, I made a quick lunch by topping some crisp crackers with juicy slices of tomato and the salsa verde. A tiny basil leaf and few pine nuts for garnish made these little canapés burst with flavor in my mouth! If you don't have crackers made, this makes a great topping for thick tomato slices. I also added a drizzle of balsamic before devouring them:)

The crackers were a variation of my rosemary crackers using Herbes de Provence in place of rosemary. The mini-breadstix were quite tasty dipped in the salsa too.


Crisp Herb Crackers
Ingredients:
2 cups almonds, soaked 8 hours, rinsed and drained
1/2 cup whole golden flax seed, ground after measure
1 cup fresh water
1/4 to 1/2 cup nutritional yeast
1-2 tablespoons Herbes de Provence*
1/2- 1 teaspoon salt
Additional herbs for top of crackers, optional

1. In food processor fitted with "S" blade, process almonds until coarsely ground.

2. Add nutritional yeast, flax, herbs, and salt, and process until combined. Adjust seasonings as desired.

3. With machine running, pour in water to form dough. Let mixture stand a few minutes to thicken if it seems too wet

4. Divide mixture in half and roll out onto 2 teflex sheets, sprinkle with additional herbs if desired, and score into crackers. I also rolled some mini-breadstix:)

5. Dehydrate at 112 degrees for about 8 hours, flipping about halfway through. Drying time depends on thickness of crackers.

6. Store in glass jars for several weeks.

*Here is a recipe for the Herbes de Provence, but you can buy this already blended.

Herbes de Provence
Ingredients:
1 tablespoon thyme
1 tablespoon chervil
1 tablespoon rosemary
1 tablespoon summer savory
1 teaspoon lavender
1 teaspoon tarragon
1 teaspoon marjoram
1/2 teaspoon oregano
1/2 teaspoon mint
2 chopped bay leaves

Mix together all of the ingredients and store in a tightly sealed container.
Makes about 1/3 cup herb mix

8/21/09

Chia-Sesame Cracker

This was my very first recipe ever posted on gone raw. It was the first recipe I made in my dehydrator, too! I still make it almost weekly. It is a sweet way to include healthy chia seeds in your raw food diet.

This makes a light, crisp, sweet cracker.

Chia-Sesame Cracker

Ingredients:
1 cup chia seeds, unsoaked
1 cup unhulled brown sesame seeds, soaked 8 hours or overnight*
½ cup light agave, or date syrup
¼ cup water, or maple syrup(not raw)**

*Also yummy using 2/3 cup chia, 2/3 cup sesame and 2/3 cup hemp seeds:)

**For the liquid, I sometimes use 1/4cup water, 1/4cup agave, and 1/4cup maple syrup... as long as there is about 3/4cup total liquid, it's all good! I always include some maple syrup:) This is how I made the ones pictured above.

Preparation:
1. Mix all ingredients together.

2. Allow mixture to stand (stir a few times) for about an hour, or more, to thicken and all liquid has been absorbed. Don't skip this step:)

3. Roll out, covered with food wrap, 1/4 inch to 1/8 inch thick on parchment paper on mesh sheet. These will work on teflex sheets, but take much longer to dry.

4. Score into desired size crackers.

5. Dehydrate at 112 degrees for 18-20 hours till crisp, or as desired.

This recipe will make 1 excalibur sheet if rolled 1/4 inch thick, or two sheets if 1/8 inch thick. The crackers pictured were rolled to 1/4 inch since I only had one open sheet in my dehydrator at the time, but I prefer them 1/8 inch:)

Click here if you would like some helpful tips on making crackers.


I love these just as they are, but they are also wonderful with your favorite jam, or nut butter.

They will keep for several weeks in a glass jar.

Here is a link to a page by Angela Stokes with lots of info and 10 more recipes for chia!

Click here for chia nutrition facts.

8/19/09

My S&M Salad Recipe


Cool salads are perfect on a warm summer day! I have been having this salad a lot lately. I created the creamy dressing as an alternate for Sarma Melngailis' popular S&M Salad.The salad is simply mixed baby lettuce with avocado cubes, a sprinkle of hemp seeds, and some torn dulse. Sarma has her recipe for the famous S&M salad posted in this interview. It is also in her most recent book, 'Living Raw Food'.

Creamy Macadamia-Lime Hemp Dressing

Ingredients:
1 cup macadamia nuts
1/2 cup fresh lime juice*
1/4 cup fresh water
1/4 cup hemp seeds
1 tablespoon agave, more or less, to taste
additional 1/4 cup fresh water or more if needed

1. In blender, combine nuts, lime juice, 1/4 cup water, and agave until creamy.

2. With blender running, add additional water until desired thickness is reached.

3. Mix in hemp seeds by hand.

Makes enough for 2 or 3 good sized salads. Keep in fridge 2-3 days in glass jar.
This is awesome as a dressing in a plain avocado half.

*to get the most juice out of your lime, have them at room temperature, press down on them and roll back and forth several times on the counter before cutting and reaming.


Raw Rosemary Crackers

Ingredients:
2 cups almonds, soaked 8 hours, rinsed and drained
1/2 cup whole golden flax seed, ground after measure
1 cup fresh water
1/4 to 1/2 cup nutritional yeast
1-2 tablespoons fresh rosemary
1/2-1 teaspoon salt
Additional rosemary for top of crackers, optional

1. In food processor fitted with "S" blade, process almonds until coarsely ground.

2. Add nutritional yeast, flax, rosemary, and salt, and process until combined. Adjust seasonings as desired.

3. With machine running, pour in water to form dough. Let mixture stand a few minutes to thicken if it seems too wet

4. Divide mixture in half and roll out onto 2 teflex sheets, sprinkle with additional rosemary if desired, and score into crackers. These are scored into 1" and 1/4" crackers. Check my post about making breads and crackers for some helpful tips:)

5. Dehydrate at 112 degrees for about 8 hours, flipping about halfway through. Drying time depends on thickness of crackers.

6. Store in glass jars for several weeks.

This is a very forgiving cracker recipe. It will work with more or less flax seed, rosemary, yeast and salt according to your personal preference:) These are also excellent using different herb blends, especially Italian mixed herbs, za'atar, or Herbes de Provence.

I could not resist making my own "Rosemary Quackers"...hehe, sorry:)

Check your dulse carefully!!!!!

I buy the large whole dulse in the bulk bins, and they usually contain a shell or two. This little critter was hiding!

A word about raw almonds...

As you probably know, all almonds purchased in the U.S. are now pasteurized. I still soak my almonds at least 8 hours before using them. They plump up and are very easy to peel at this point if desired. They pop right out of the skin if you pinch them after soaking.
The almonds in the picture show unsoaked (top right), soaked (bottom right), peeled(bottom left), and the empty skins (top left). Notice the soaked almonds get a white point that sticks out at the tip. The soaked almonds are smooth and plump, and quite a bit larger than unsoaked. The soaked almonds can be dehydrated and ground for almond flour, or just a crunchy snack.

8/17/09

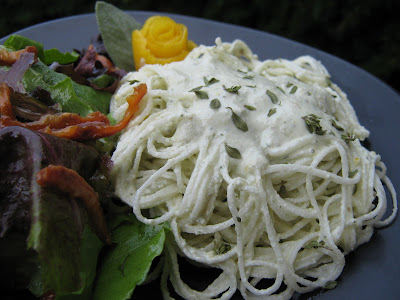
Parsnip Pasta with Sage-Lemon Cream


This is another recipe from 'Living Raw Food' by Sarma Melngailis. Just reading the ingredient list told me this would be wonderful! I also liked it because it did not require very much effort to create.

The parsnip pasta only needs a few hours to soften in a little wine and salt. I also sprialized a turnip (pictured) at the same time to try the recipe using that as the pasta. They looked identical, but there was a difference in taste between the two. I liked the parsnip just a tiny bit more than the turnip:)

After making the noodles I soaked the pine nuts for the sauce, as they only need about an hour or so. I used my bullet to blend the pine nuts, wine, shallot, sage, (lemon)thyme, lemon juice and zest, oil, nutmeg, and salt. This made a lovely, unique cream sauce.

I served it with a salad of mixed baby lettuce, oil, lemon juice, pinch of salt and pepper, and thinly sliced dried apricot. Sarma paired the pasta with this salad using arugula for the greens. I let the apricots plump in the dressing for about a half hour before mixing it with the salad. I did not have the optional black truffle that looks so pretty in Sarma's picture, so I used my lemon peel rosebud with a sage leaf and a sprinkle of thyme leaves.

Thanks to Sarma for another great recipe! This was a very refreshing lunch on a warm Adirondack day!

8/14/09

Raw Caramel Brownie Bites


I have been thinking about creating a recipe like this for a while.

They are made from three of my own recipes I have used before, combined:)

I like to make decadent desserts such as this one in a miniature size, because they are so rich !

The Brownie Crust:
1 cup pecans
1/2 cup dates, about 6 medjool
2-4 Tablespoons cocoa powder
1 tablespoon coconut oil, softened
Optional:
pinch of salt, dash of vanilla

1. Pulse nuts in food processor fitted with "S" blade until coarsely chopped

2. Pulse in dates, cocoa, and oil(and salt and vanilla if using) until mixture begins to hold together

3. Press into 12 flexible mini muffin cups, or 1 or 2 larger tart pans forming a thin crust.
This also works well as a bar type of treat in a 8"x8" pan.

4. Chill while making caramel.

You can also make this with your own favorite brownie mixture, and any nut you prefer.

Caramel Filling:
1/2 cup dates, about 6 medjool
1/2 cup water
1/4 cup lucuma powder
1/4 cup coconut oil, softened
vanilla seeds from about 2" of vanilla bean, or 1/2 teaspoon vanilla extract
pinch of salt

1. Blend all ingredients until smooth in magic bullet or blender.

2. Spoon into chilled brownie crust.

3. Chill while making chocolate topping.

These are also excellent with a center of sweetened almond butter:)

Chocolate topping: This is just my chocolate chip recipe:)
2 tablespoons coconut oil, softened
2 tablespoons cocoa butter, liquid measure after melting ( approx 1/4 cup grated flakes from block of butter)
1 heaping teaspoon cocoa powder
1 teaspoon agave
Optional:
pinch of salt, dash of vanilla
Garnish:
12 pecan halves, optional

1. Melt cocoa butter in small cup placed over very hot water until liquid. I use a pyrex custard cup set in a mug filled with really hot water.

2. When melted, stir in coconut oil, cocoa, and agave (and salt and vanilla if using).

3. Stir until all ingredients are smooth.

4. Allow to cool until it is the texture of very thick hot fudge.

5. Spoon by teaspoon onto top of caramel on chilled tarts.

6. Top each with a pecan half, or chopped nuts mixed with cacao nibs.

7. Chill until firm.

Best kept in the fridge in the summer:)

8/12/09

Brunch!

Devilled Chestnut Mushrooms on Toast!

If you signed up for The Raw Chef Russell James' eZine you most likely got this new recipe in your email yesterday. I love to try new recipes, as you may have noticed:)
This recipe also includes a raw aubergine(eggplant) bacon.

I started the bacon last night, slicing an eggplant with my electric food slicer, and marinating them for a few hours in a blend of oil, cumin, garlic, onion, tamari, sweetener(maple syrup), and chipotle pepper. I have made lots of eggplant bacon, and loved to find a new recipe for it. I noticed when I made Russell's kale salad that it had a slight BLT flavor from the chipotle, and even came up with a new version of my own bacon using it! This made a crisp , spicy bacon:)

I have never come across chestnut mushrooms while shopping, but saw online that cremini (aka baby bella) or portobello may be used as a substitute, so I used those. They are marinated for 2 hours in oil and tamari, then dehydrated for 2 hours. I was never a huge fan of raw mushrooms, but am pleasantly surprised that I have found quite a few ways to enjoy them recently!

This recipe has a wonderful looking toast. I "cheated" a little here, because I used Russell's nut free bread I made last week. Both breads contain similar ingredients, so I thought it would make a good substitute. I will try the toast recipe next time I make bread:)

The last component is a lovely sauce. This is a creamy blend of cashews, nutritional yeast, paprika, shallot, lemon juice, vinegar, garlic, salt, and water.

To serve, the toast is topped with sliced tomato, the mushrooms, and a dollop of cream sauce. Three slices of bacon are added, and a sprinkle of fresh parsley. I also added a dash of paprika for color.

Thank you to chef Russell James for this amazing recipe! I enjoyed it very much:)

8/10/09

Raw Summer BBQ!

Here is another great recipe from the pages of 'Living Raw Food' by Sarma Melngailis.
It is created by former 'Pure Food and Wine' chef Amanda Cohen.

Skewered veggies with a wonderful BBQ sauce, Coleslaw dressed with Dill "Mayonnaise", and Vegetable Chips.

Last night, I sliced the veggies needed for the chips. I used my electric food slicer, as it makes an entire dehydrator full of chips in about 15 minutes, including cleaning the machine :) I used carrot, red beet, sweet potato, and yucca. The recipe calls for taro root and golden beets which were not available, so I just used what I had. I did have the parsnips called for, but they would not fit in the dehydrator after slicing the other veggies. After dehydrating, they are sprinkled with oil and salt. I did try it this way, but usually prefer to add oil and salt before dehydrating. I like to use an oil mister to lightly coat the chips with oil before sprinkling with pink salt.

The Chips

In the morning, I soaked the mac nuts needed for the mayo.

I also soaked the sun-dried tomatoes for the BBQ Sauce.

It was also the time to "brew" the Lapsang Souchong tea needed to impart the smokey flavor in the sauce. I have used it before in other dishes, and found it very strong, so I reduced the amount I used.

The BBQ Sauce is made by simply blending the tea with soaked tomatoes, shallot, nama shoyu, vinegar, maple syrup, oil and salt. It is then used to marinate the veggies which consist of zucchini, peppers, cherry tomatoes, mushrooms, and fennel. I also threw in some yellow summer squash:) After marinating a few hours, the veggies are skewered and dehydrated for 3 hours.

The Veggies

Next, I made the yummy Coleslaw. The dressing is made with the soaked mac nuts, water, lemon juice, oil, shallot, salt and dill. I used the larger shredding blade on the food processor to quickly shred the red and green cabbages, carrot, and daikon. The scallion was sliced thinly by hand. This was so good, I actually had some for breakfast since I hadn't eaten yet:)

The Coleslaw

I enjoyed everything very much. It was very festive and colorful. The flavor of the BBQ sauce concentrated while dehydrating and really tasted grilled! If you are going to a 'SAD' barbecue, this would be a wonderful raw option:).

Thanks again to the lovely Sarma Melngailis for sharing this recipe, and to Amanda Cohen for creating it.
I am looking forward to trying more recipes from this book!

8/5/09

Sarma's Chanterelle and Kalamata Olive Ravioli

Sometimes you can just look at a recipe, or read the name, and know you will love it:)

Chanterelle and Kalamata Olive Ravioli, Macadamia Cream, Herb Sauce, and Pistachio-Parsley Salad.
See what I mean!


Sarma Melngailis' latest book, Living Raw Food, features this lovely recipe. The ravioli was created by chef Amanda Cohen. The book jacket said it is the most beloved entrée at Pure Food and Wine, Sarma's famous restaurant. After making it, I know why:)

The pasta is made with young coconut meat, and a small amount of flaxseed, zucchini, shallot, and salt. It whips up quickly in the blender. My coconut had very thick, firm meat, so I needed a splash of water to blend. The creamy mixture was dehydrated for a few hours and created a surprisingly sturdy pasta. The directions say to dry for two hours before flipping, but mine needed about three. One hour after flipping, the pasta was done.

An hour or so after the dough had been drying, I chopped the mushrooms for the filling, and mixed them with a little oil and salt. These needed to dehydrate for about 2 hours. This was also the time I started to soak the macadamia and pistachio nuts needed later in the recipe.

The dried dough cut very nicely into squares. I used a serrated ravioli wheel to cut the dough, but it also worked well with a standard ravioli cutter if you happen to have one;) I find another great way to cut tender dough is with a pizza cutter. I wrapped my trusty metal ruler with cling film, and used it as a guide to cut along.


The next step was to make the Macadamia Cream, since you need the solids from making it in the filling. Soaked macadamia nuts are puréed with water, a little garlic, and nutritional yeast. The blended cream is then strained. I pushed it through a mesh strainer with the back of a large spoon, which worked well. The remaining solids are added to the filling.

The strained cream is placed back in the blender with a little soaked pistachio. I needed a bit more water to the final sauce to make it blend, and it was still a little thick, but I like it that way:)

The flavorful filling is made with the dehydrated mushrooms,the reserved solids from the cream, olives, shallot, nutritional yeast, oil, salt and lemon zest. I omitted the salt since the olives had enough salt for my taste:)

The last component needed for the ravioli is the Herb Sauce. This is an amazing blend of basil, parsley, tarragon, thyme, scallion, rosemary, lemon zest and juice, oil and salt. It is prepared quickly in the food processor.

I also whipped up a little Pistachio-Parsley Salad. This is a beautiful mix of parsley, lemon juice and zest, oils, nuts, salt and pepper. I chopped the pistachios in the food processor in the same bowl after the herb sauce was poured out, so they had an extra touch of flavor.

Time to assemble!
I used my tiny ice cream scoop to place a little of the filling onto half of the pasta squares. Top with another square and squish together a little. I laid them on the cutting board and brushed them with the herb sauce.

Place a little cream sauce on the plate, and arrange the ravioli around it.

I added a bit of the Pistachio-Parsley salad, and my signature "rosebud" garnish, made with lemon peel:)

Thank you to Amanda Cohen for this amazing recipe, and of course to Sarma for sharing it in her lovely book.

8/3/09

Making Beautiful Raw Breads and Crackers

One of my favorite things to create are raw breads and crackers. I find it very satisfying, and very much like preparing conventional crackers or cookies, with the exception of baking in the oven:)

Raw breads are great for sandwiches.

Even the tiniest crouton can make a big difference in a salad. These are 1" and 1/4" rosemary crackers on my adaptation of Sarma's S&M salad:)

Most bread and cracker doughs are prepared quickly and easily in the food processor.
Here are some pictures to show how I shape my raw breads, crackers, and chips.

I like to work with the teflex sheet directly on a clean counter. If you place the sheet on a freshly washed and still damp counter, it won't slide around.

Spread dough onto teflex using an offset spatula.

If you want a rustic looking cracker, you can stop at this step. Just spread the batter, dehydrate, and break into pieces:)

...but if you want a fancy cracker:)...

Cover with cling film, and roll out to desired thickness. I like to use a rolling pin that is long enough to straddle the teflex sheet, and roll over the entire dough very easily. The rubber rings fit on the ends of the rolling pins, and roll the dough to the exact even thickness desired:) If any dough squishes out past the sheet just put it back in the bowl, or use it to fill in the corners. After doing it a few times you can judge how much dough will fit on the sheet.


Score using a long, thin, ruler. This is a metal yardstick from the fabric department.

Since I am not sure about the food safety of the ruler, I score while the dough is still covered with the wrap. I score around all four sides first to make a neat edge, then score the rest. I usually remove the dough that is trimmed off, but they make good "test pieces" if you don't:) The largest pieces I usually make are made by scoring into 9 pieces(like a tic-tac-toe board, two lines down, two lines across). The smallest are 1/4 inch croutons!

Or use a crust cutter to make bread shaped bread:)


Special shapes can also be created by using any cookie or fondant cutter. It helps to wiggle the cutter slightly to insure a neat score in the dough. I leave the scraps in place, and dry at least halfway(after flipping) to remove the cut out shapes and finish drying. I always like to nibble on the scraps, or use them in a salad.

....now you can stop here, or before dehydrating....

Stencil if desired using crushed herbs and spices. Simply lay the stencil on the dough after scoring, sprinkle a small amount of herbs into the opening of the stencil, and sweep the herbs inside the opening with a brush or clean finger:).

I usually try to match the flavors in the dough.

Even when I don't stencil, I like the look of extra spices or herbs sprinkled randomly on the dough.


I also use the lid of a sandwich keeper to shape some breads. The bottom can be used as a cutter. This is my crazy carrot bread:)


The tray below is now ready to dry. I find setting the thermostat at 112 degrees works best for most items. If a special recipe calls for a higher temperature for the first hour or so, I go with that.

Flip halfway through by placing a mesh sheet and an empty tray upside-down on top of the crackers. Quickly turn over while holding the edges of the trays tightly together. Remove the original tray and mesh sheet.


Peel away teflex sheet. You can see the crackers automatically start to separate on score lines:) Separate pieces at this point and continue dehydrating on mesh sheets.

Here are several other options when making raw chips and wraps:
If using a thicker batter for chips, you can make different shapes.
Triangle chips can be made by scoring as pictured below. I used the long ruler to make the horizontal lines, then scored the angled lines with the end of a small straight edged spatula.

Some chip or tortilla recipes are made in the blender, and produce a runny batter. For these, simply pour, or spoon out the batter directly onto the teflex sheet. Small chips can be spooned onto the teflex and spread out slightly using the back of the spoon in a circular motion.


Large tortillas (or ice cream cones) can be spread out using an offset spatula. I have a large and small offset spatula. I like to sprinkle seeds or herbs on the dough before dehydrating. This wrap also has a flower pattern made with cut out spinach leaves. Sprinkle the seeds and place the flowers on the rolled out dough, then replace the cling wrap and roll again gently to set the decorations.


If the dough is not too sticky, you can make shaped breads by rolling long rope-like shapes and forming pretty bread-sticks. Three ropes can be braided together. The other shapes are single ropes, twisted or curled:)

Here are the links for the rolling pins and rubber rings:
The white roller pictured is a fondant roller made by Wilton. The rings I use were purchased separately.


I hope you find these tips helpful the next time you makes some yummy breads, crackers or chips!
Related Posts with Thumbnails